Today I will show you how to create animated flames like the ones used in my 3d character animation. Gimp will be used and GAP is also needed. This is a plugin that provides animation controls in gimp.
First select an image of a flame, if you can get an image with a solid background colour or even better a transparent one. We will use the animation menu to animate this in a second but first we need to remove the background if it isn’t already transparent.
I am not going to cover how to remove a background from an image in great detail as there are lots of other tutorials that already cover this.
First right click on the layer and select Add alpha channel to add an alpha channel to the layer.
Now using the Fuzzy Select Tool (Magic wand) or the Select by Colour Tool select the background. This will work best if the background is a solid colour. If not it may be easier to use the Paths Tool or Free Select Tool to draw a selection around the flame. Adjust the threshold of the Fuzzy Select Tool and use the grow, shrink and feather selection options to select as much of the background as possible and delete it. Next keep using the same tools until all of the background is removed.
Below is the final cleaned up image, I cropped the image so that the flame was in the centre. Now with this complete we need to create the rippling effect.
Next select Animation>Rippling...
Adjust the rippling strength until you get a rippling motion that you like. In my animation I used a rippling strength of 3. Increase the number of frames according to the length of animation required and the frame rate being used. Make sure the Edge behaviour is set to black (not wrap which is the default option) otherwise the flames will wrap around the edge of the image.
Clicking ‘OK’ will create a new file with a layer for each frame. The only downside is that a grey background is added rather than staying transparent. Don’t worry your hard work of removing the background wasn’t for nothing as it should now be easier to remove the plain grey background that is applied especially if the original background wasn’t a solid colour.
You should now have a separate image with a series of layers in it. Now we need to remove this grey background to change it back to transparent. We will use colour to alpha to take the grey colour and turn it to 100% opacity. Use the eye dropper to select the grey colour and note the html notation (hex code) for the colour.
The colour I found with the eyedropper was 7f7f7f.
Select Filter>filter all layers. This can be used to apply filters to all layers. If you don’t see the filter all layers option in the filters menu, make sure you have installed GAP correctly. For a tutorial on installing GAP in Gimp 2.8 on Windows see here.
Select ‘plug-in-colourtoalpha’ and then click the ‘Apply Constant’ button.
When the colour to alpha window comes up adjust colour by typing in the html notation noted from before (7f7f7f). This should remove the background from all the layers. Next we need to export all of the layers as images.
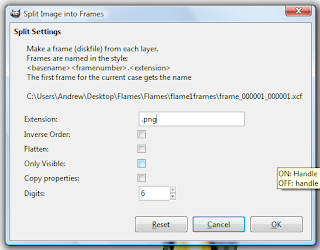
To do this use Video>split images to frames. Change the file name and make sure the file type is set to PNG (So that it keeps the alpha channel).
Click OK and a series of PNG images one for every layer should be created. This PNG sequence can then be used as needed. In the GIF below the results look a little crude but with the glow applied and the image scaled down for the video the result is acceptable.
When creating my animation I imported the sequence into After Effects and composited into a scene. I scaled and positioned the images into place and created a glow around the flames. The glow was created by duplicating the sequence and applying a Gaussian blur of 100 pixels to create a subtle glow around the flames and then duplicating the sequence again and applying another Gaussian blur this time of only 20 pixels to create a darker glow around the flames.


Nice one.do you have other GIF Animation video tuTorials?
ReplyDeleteGlad you liked it. Unfortunately this is the only GIF animation tutorial at the moment.
Delete3D modeling software Houston, Texas is the great way to make architectural design or animated that design into 3D which certainly give the clear concept to the clients.
ReplyDeleteEssay Help Zone offers you to avail the services of writing all types of academic essays. They are the most renown firm in the UK that offers online essay help to the students to achieve their academic goals in good grades. They have the best team of expert essay writers who are extensively experienced to provide you with the best quality of essay writing.
ReplyDeleteAmazing!
ReplyDeleteBrand Animators
3D Product animation video company in Houston, Dallas, Texas, USA
Great post! I really enjoyed your deep dive into the evolving world of architectural visuals. The section on modern digital techniques especially caught my attention, as innovations like 3d interior render are transforming the way we experience and plan interior spaces. I've witnessed firsthand how this technology can bridge the gap between conceptual design and tangible reality—allowing designers and clients alike to explore vibrant, lifelike representations before any work begins.
ReplyDelete