Pages

16 May 2017

Customise Folder & App icons in OS X

Updated to include instructions for OS X El Capitan and macOS Sierra

Customising icons in OS X is pretty easy and is a great way to personalise your machine.


Changing an item’s icon

1. Select the folder or app whose icon you wish to change and press cmd + i to open the Info panel (alternatively right click the item then select Get Info).

Select the folder or app then press cmd + i to open the Info panel

2. Open the image you want to use as the icon in Preview then press cmd + c or click Edit > Copy to copy the image.

Open the image in Preview and copy it with cmd + c

3. Back in the Info panel click the small icon in the top left corner (not the preview at the bottom). It should have a blue outline once selected correctly, then press cmd + v to paste the new icon. If you are customising a system app you may be prompted to enter your password before the changes are applied.

Selected Info panel icon showing blue outline


Resetting an item’s icon

Removing an icon is just as easy, click the small icon at the top of the Info panel again and press delete to revert back to the original icon.

Remove the icon by pressing delete


Forcing Dock icons to update

Once you have made the change the icon should be immediately updated in the Finder and the Info panel but to force the icon to update in the Dock run killall Dock in the terminal to restart it.

Run killall Dock to force the dock icons to update

Customising the Finder icon

Changing the Finder icon is a bit more tricky, as it requires manually replacing the icons and clearing the icon cache.

1. Navigate to /System/Library/CoreServices/Dock.app/Contents/Resources/. The easiest way to do this is to press cmd + shift + G in Finder to open the ‘Go to Folder’ panel and then enter path.

Use the Go to Folder panel to navigate to /System/Library/CoreServices/Dock.app/Contents/Resources/

2. Locate the files ‘finder.png’ and ‘finder@2x.png’ and backup up these files, as they will be needed if you ever want to revert back to the original icons at a later date. I renamed the files to finder.bak.png finder@2x.bak.png respectively.

3. Then copy your new finder icons into this folder making sure they are named ‘finder.png’ and ‘finder@2x.png’.

Backup the originals and copy in the new icons

4. Now we need to find and delete the icon cache, this will force the cache to be recreated and updating the icon in the process. Navigate to /private/var/folders/ and then search for ‘com.apple.dock.iconcache’ selecting folders option to search within the folder rather than the whole Mac. Put this file into the trash then run killall Dock from the terminal to restart the dock.

Delete the com.apple.dock.iconcache file

Resetting the Finder icon

To revert to the default icon just repeat the previous steps but use the icons backed up previously.


OS X El Capitan and macOS Sierra

One of the new features of El Capitan is Security Integrity Protection that prevents system files being added, edited, or deleted.

This means that while SIP is enabled you won’t be able to change the icons for system programs such as Finder, Safari, and iTunes.

Luckily it’s straightforward to disable SIP temporally, change your icons using the process outlined above, then re-enable to ensure your system is secured.


Disable SIP

1. Reboot your Mac and hold cmd + r to boot into Recovery Mode
2. Click Utilities in the menu bar, and select Terminal
3. Type the following command into the terminal then hit return: csrutil disable; reboot

Enable SIP

1. Reboot your Mac and hold cmd + r to boot into Recovery Mode
2. Click Utilities in the menu bar, and select Terminal
3. Type the following command into the terminal then hit return: csrutil enable; reboot

23 July 2012

How to create animated flames using Gimp

Today I will show you how to create animated flames like the ones used in my 3d character animation. Gimp will be used and GAP is also needed. This is a plugin that provides animation controls in gimp.
First select an image of a flame, if you can get an image with a solid background colour or even better a transparent one. We will use the animation menu to animate this in a second but first we need to remove the background if it isn’t already transparent.
I am not going to cover how to remove a background from an image in great detail as there are lots of other tutorials that already cover this.

First right click on the layer and select Add alpha channel to add an alpha channel to the layer.
Now using the Fuzzy Select Tool (Magic wand) or the Select by Colour Tool select the background. This will work best if the background is a solid colour. If not it may be easier to use the Paths Tool or Free Select Tool to draw a selection around the flame. Adjust the threshold of the Fuzzy Select Tool and use the grow, shrink and feather selection options to select as much of the background as possible and delete it. Next keep using the same tools until all of the background is removed.
Below is the final cleaned up image, I cropped the image so that the flame was in the centre. Now with this complete we need to create the rippling effect.
 Next select Animation>Rippling...

Adjust the rippling strength until you get a rippling motion that you like. In my animation I used a rippling strength of 3. Increase the number of frames according to the length of animation required and the frame rate being used. Make sure the Edge behaviour is set to black (not wrap which is the default option) otherwise the flames will wrap around the edge of the image.

Clicking ‘OK’ will create a new file with a layer for each frame. The only downside is that a grey background is added rather than staying transparent. Don’t worry your hard work of removing the background wasn’t for nothing as it should now be easier to remove the plain grey background that is applied especially if the original background wasn’t a solid colour.
You should now have a separate image with a series of layers in it. Now we need to remove this grey background to change it back to transparent. We will use colour to alpha to take the grey colour and turn it to 100% opacity. Use the eye dropper to select the grey colour and note the html notation (hex code) for the colour.
The colour I found with the eyedropper was 7f7f7f.
Select Filter>filter all layers. This can be used to apply filters to all layers. If you don’t see the filter all layers option in the filters menu, make sure you have installed GAP correctly. For a tutorial on installing GAP in Gimp 2.8 on Windows see here.
Select ‘plug-in-colourtoalpha’ and then click the ‘Apply Constant’ button.

When the colour to alpha window comes up adjust colour by typing in the html notation noted from before (7f7f7f). This should remove the background from all the layers. Next we need to export all of the layers as images.
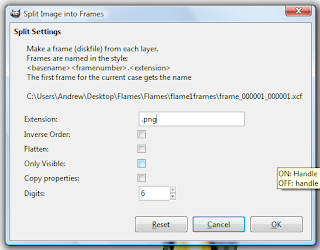
To do this use Video>split images to frames. Change the file name and make sure the file type is set to PNG (So that it keeps the alpha channel).
Click OK and a series of PNG images one for every layer should be created. This PNG sequence can then be used as needed. In the GIF below the results look a little crude but with the glow applied and the image scaled down for the video the result is acceptable.
When creating my animation I imported the sequence into After Effects and composited into a scene. I scaled and positioned the images into place and created a glow around the flames. The glow was created by duplicating the sequence and applying a Gaussian blur of 100 pixels to create a subtle glow around the flames and then duplicating the sequence again and applying another Gaussian blur this time of only 20 pixels to create a darker glow around the flames.

22 July 2012

Extracting images from a Word document

Extracting all the images files from a Word document is simple and can be completed in just 4 steps.

Step 1

Duplicate the file and rename file file changing the extension to .zip. When a messaged appears asking if you are you sure you want to change the file extension click 'Yes'. This will change the file to a ZIP file.

Step 2

Next open the file zip file. We need to look in the word folder.

Step 3

Inside the word folder there should be a media folder with the images inside.

Step 4

The images can simply be copy and pasted from here to another folder on you computer.

1 July 2012

Installing GAP for Gimp 2.8 on Windows

The first step is to find and download the installer. Next we will extract the files from the installer and manually install the files in the user directory. As Gimp 2.8 is backwards compatible with plug-ins we will use the 2.6 windows installer for GAP.

Gimp plug-ins can either be installed into the user directory or into the program's installation folder. Putting the files in the user directory would mean that they are only available to that individual user whereas installing into the program’s installation folder the plug-ins would mean that they are available to all users. Installing into the user directory folder also makes it easier to manage and identify plug-ins that have been installed by the user rather than plug-ins that are distributed with Gimp.

To install the plug-in into the user directory folder follow the instructions below. To install into the program’s installation folder in step 3 set the destination folder to the gimp 2 installation folder. The default location for this is noted below.

C:\Program Files\GIMP 2

If Gimp 2.8 wasn’t installed in the default location this will need to be adjusted.


Step 1 – Download the file 


Download GAP-2.6 for Gimp 2.6-Windows from the link below.
http://photocomix-resources.deviantart.com/art/GAP-2-6-for-Gimp-2-6-Windows-135464357
Make sure you download the zip file using the button on the right of the page and not the source code linked at bottom of the text.

Step 2 – Extract the files 


Extract the zip file to your desktop and navigate inside the GAP .2.6_win folder.
This folder contains 5 folders and a text file describing how to install GAP.
For now we need to look inside the GAP-installer folder, we will come back to the others later.


Step 3 – Run the installer 


Double click on the installer to run it. If a UAC (User account control) dialogue box appears select ‘yes’ to continue.
Select your language then run through the installer. When it comes to selecting the destination folder the installer will NOT auto-populate with a destination folder as it is the 2.6 installer so we will need to manually move the files into the plug-ins folder later.
For now create a new folder on the desktop (this is probably easiest but the folder could be created anywhere), select this as the destination folder and then click install.
Once it complete click finish. If a message about the program not installing properly pops up just click cancel.
Now inside the new folder you created on your desktop there should have been two folders, lib and share installed.
If you look through the lib folder you will see a folder structure like the one shown below:

lib>gimp>2.0>plug-ins 

And inside the plug-ins folder is a series of exe files. These are the plug-ins that we need to place inside the Gimp 2.8 plug-ins folder.
Now if you look through the lib folder you will see a folder structure like the one shown below:

share>gimp>2.0>scripts 

And inside the scripts folder are a couple of script files that we will need to place in the Gimp 2.8 scripts folder.


Step 4 – Manually place files in the plug-in folder


As said in the previous step the plug-in files need to be placed inside the Gimp 2.8 plug-ins folder. So where is this located? If you navigate to:

C:\Users\Yourusername 

With ‘yourusername’ replaced with your actual username e.g. C:\Users\Andrew

You will see that amongst the other files are two folders relating to Gimp, .gimp-2.6 and .gimp-2.8. The one that we are concerned with is of course the 2.8 folder. It can be located here:

C:\Users\Yourusername\.gimp-2.8

Inside this folder look for the plug-ins folder then copy and paste the files from the plug-ins folder created earlier and paste them here.
Make sure to only to paste the exe files and not the folders.
Also in the .gimp-2.8 folder where you found the plug-in folder is a scripts folder.
Copy and paste the scripts from the scripts folder created earlier and paste them here.
Next start Gimp, a message will be displayed ‘Querying new plug-ins’ and you may see a series of command windows flick up on the screen for a fraction of a second.
When Gimp has fully loaded there will be a video entry on the top toolbar where the new plug-ins can be accessed from indicating GAP has been installed successfully.
Check out the documentation in the zip file provided for information on how to use GAP.


Step 5 – Installing the other animation scripts/plug-ins (optional)


Along with the GAP plug-in photocomix has also included some extra animation scripts and plug-ins as well as some documentation and tutorials. These are not part of GAP but can be useful when animating using Gimp.

In the original extracted file are the folders, EXTRA_ANIMATION_SCRIPTS, EXTRA-AUDIO-support and EXTRA-plugin-Animated_Cursor. The EXTRA_ANIMATION_SCRIPTS can be installed by copying the contents to the user directory in the same way as we did with the GAP scripts.

C:\Users\Yourusername\.gimp-2.8\scripts 

The EXTRA-plugin-Animated_Cursor can be installed by copying the contents to the user directory in the same way as we did with the GAP plugins.

C:\Users\Yourusername\.gimp-2.8\plug-ins 

To install the EXTRA-AUDIO-support you will need to navigate to

C:\Program Files\GIMP 2\bin 

And paste the files there.
Back to top